
Electricity Science Projects
Here are a series of electricity science experiments for the curious minds.
Experiment 1 – Water and Electricity
“Don’t touch a switch with wet hands!”
We were all taught that since we were little kids.
It does seem like water can conduct electricity and that is why we shouldn’t touch any electrical outlet or switches if our hands are not dry.
Does water really conduct electricity?
Let’s find out by doing a simple controlled experiment to learn about the conduction of electricity.
In this experiment, you will learn that pure water doesn’t conduct electricity, but conductivity increases if you add impurities in the water.

Does Water Conduct Electricity Experiment
Does water really conduct electricity?
Let’s find out by doing a simple controlled experiment.
Materials
- small LED diode
- 2 small button batteries
- copper wires or electrical wires with alligator clips
- scotch tape
- tap water
- distilled water (you can use bottled ones or make your own distilled water)
Tools
- small container
- adult supervision
Instructions
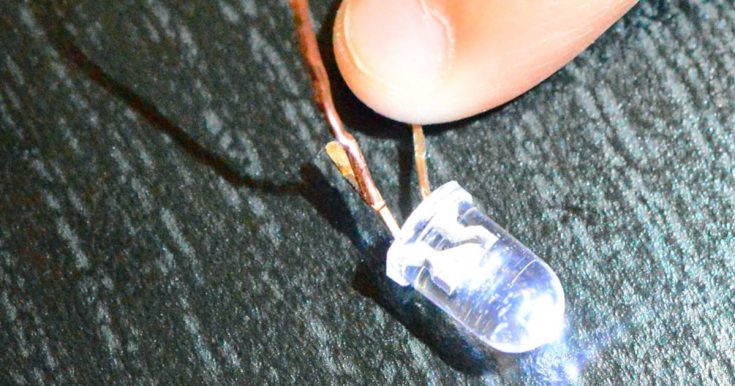
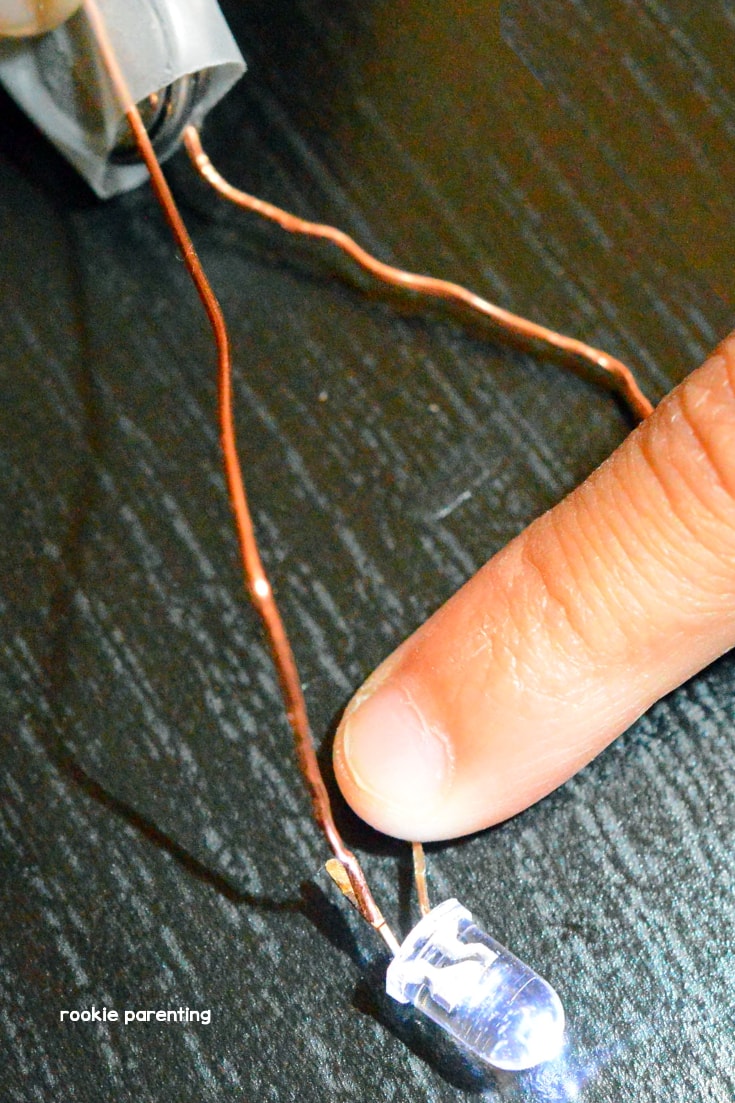
- Fill the small container with tap water.
- Using the electrical wires, connect the LED light and batteries to build an open simple circuit (a circuit with an open end).
- Dip the two open ends into the water.
- Now, repeat the experiment using the exact same setup, but this time, instead of using tap water, use distilled water.
- Using tap water, you should be able to complete the circuit and the LED bulb lights up.
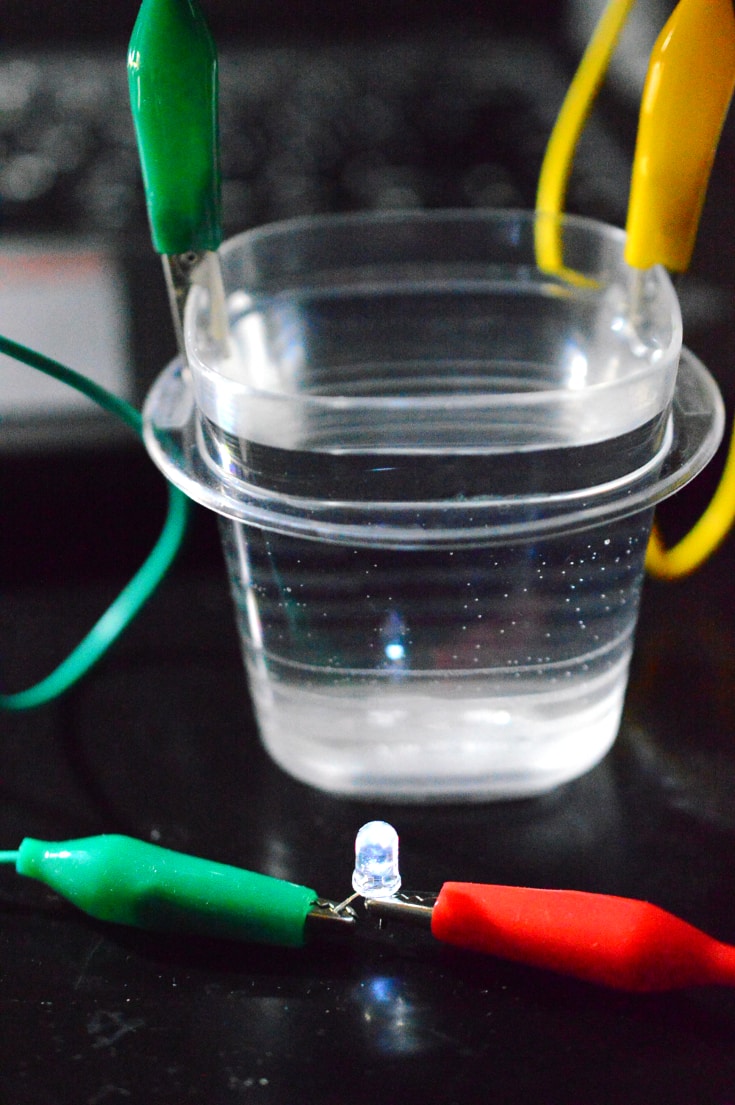
- Using distilled water, however, does not complete the circuit and the LED bulb should not light up. However, if yours does, that means the “distilled water” used is not pure enough. Try a different brand of bottle distilled water or make your own.

Notes
Why does water conduct electricity and why doesn’t water conduct electricity
A controlled experiment is a test done twice with exactly the same conditions and variables except for one.
That one varied element is called an experimental control.
In this exercise, water is the experimental control.
Everything else in the experiment remain the same.
So we can conclude that the difference in the outcome is caused by the control, i.e. the water.
So tap water can conduct electricity while distilled water cannot.
Explore
- Do the experiment again by adding salt into the pure water and see if the LED bulb lights up.It should.The LED bulb may even be brighter than the one using tap water because salt water conduct electricity better than tap water does.
- Do the experiment again by adding sugar into pure water.This time, the LED bulb does not light up because sugar cannot contribute ions to the solution.
Recommended Products
As an Amazon Associate, I earn from qualifying purchases.


An electric current is conducted by a flow of electrical charges such as electrons or ions.
Pure water contains very few ions and so it is a poor electricity conductor.
But when impurities such as salt or sugar dissolve in water, the resulting solution conducts electricity very well.
Tap water is full of impurities.
Most water we come into contact with, such as tap water or not completely distilled bottle water, contain impurities that turn water into a conductor.
That is why you MUST NOT touch electrical outlets or switches with wet hands.
But not all impurities can do so, only those that can contribute ions, such as salt.
Experiment 2 – Direct Current Motor
There are two types of electricity: direct current (DC) and alternating current (AC).
In this electricity project, we will build a DC motor using some simple supplies.
How To Build Simple DC Motor
If you like playing with magnets, you will love this building a simple motor experiment.
Warning: It is crucial to emphasize the importance of adult supervision during such experiments, as magnets can pose a hazard if swallowed. Please keep them away from children who still put everything into their mouths.
There is also a risk of short circuits leading to excessive heat when handling battery terminals. Insulated wire is recommended to ensure safety during the construction process.
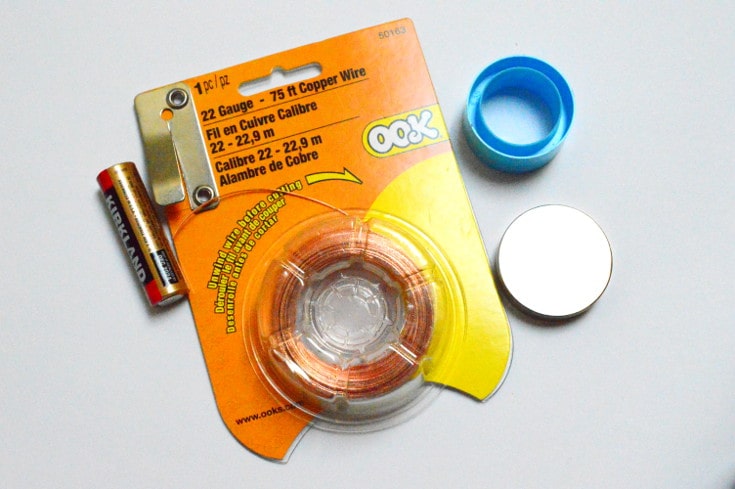
Materials
- neodymium disc magnet
- (thick) copper wire or this thinner version that we used (which is more challenging but still doable)
- alkaline battery such as AA or AAA
Tools
- wire cutter
- a plastic ring to support the magnet (optional)
- adult supervision
Instructions
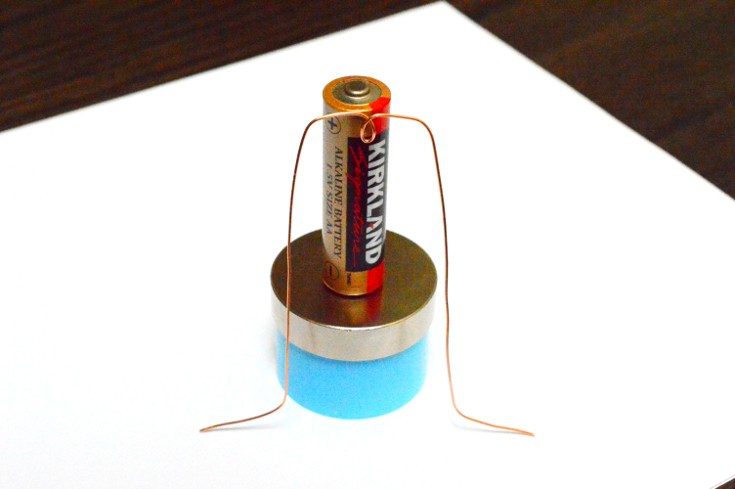
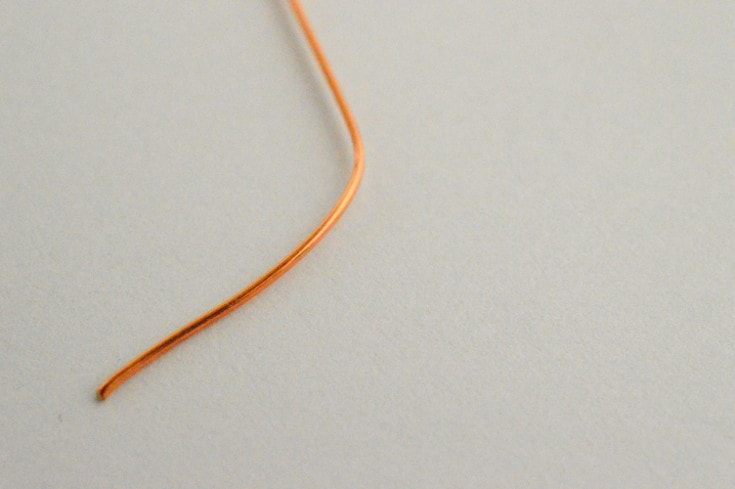
- Cut a piece of copper wire that is roughly 6-8 inches long.
- Bend the wire in the middle to create a contact point to stand on top of the battery.
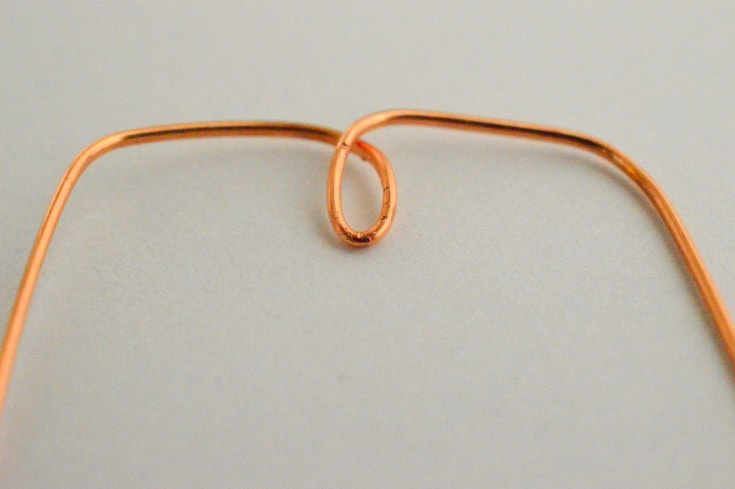
- While the middle of the wire stands on top of the battery, bend both sides of the wire downwards.
- You can make any shape you want as long as the center can balance on the battery when it spins and the wire frame can touch the magnet that will be placed underneath the battery.
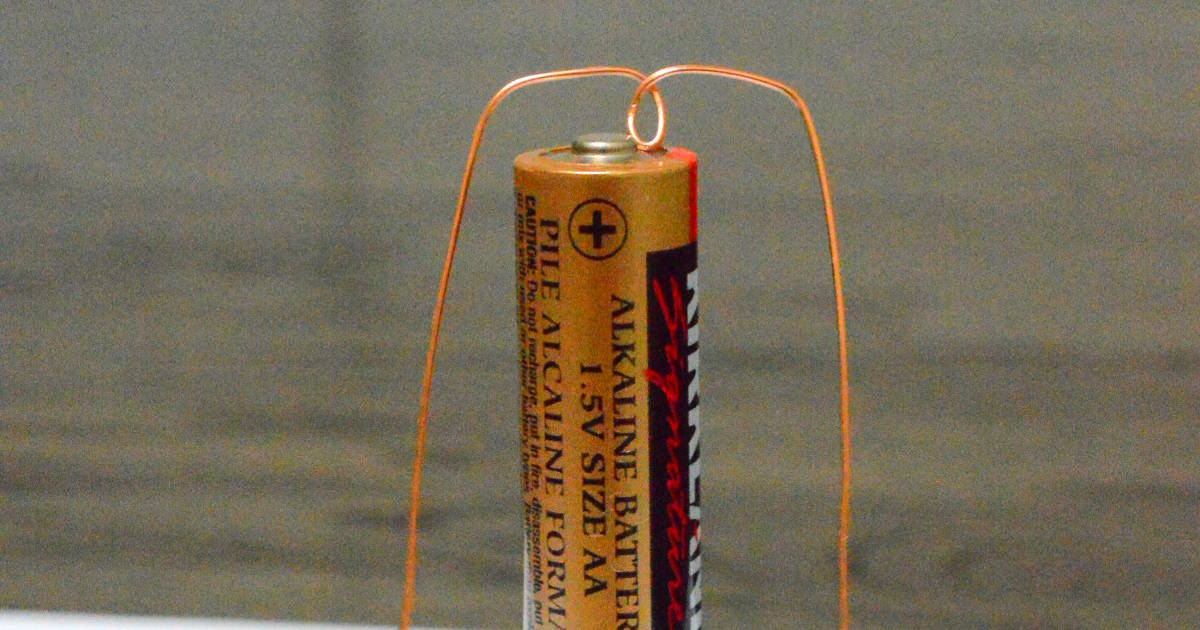
- (Optional) Place the magnet on top of the plastic ring. I use it because my wire frame is quite long and it will touch the table without the ring.
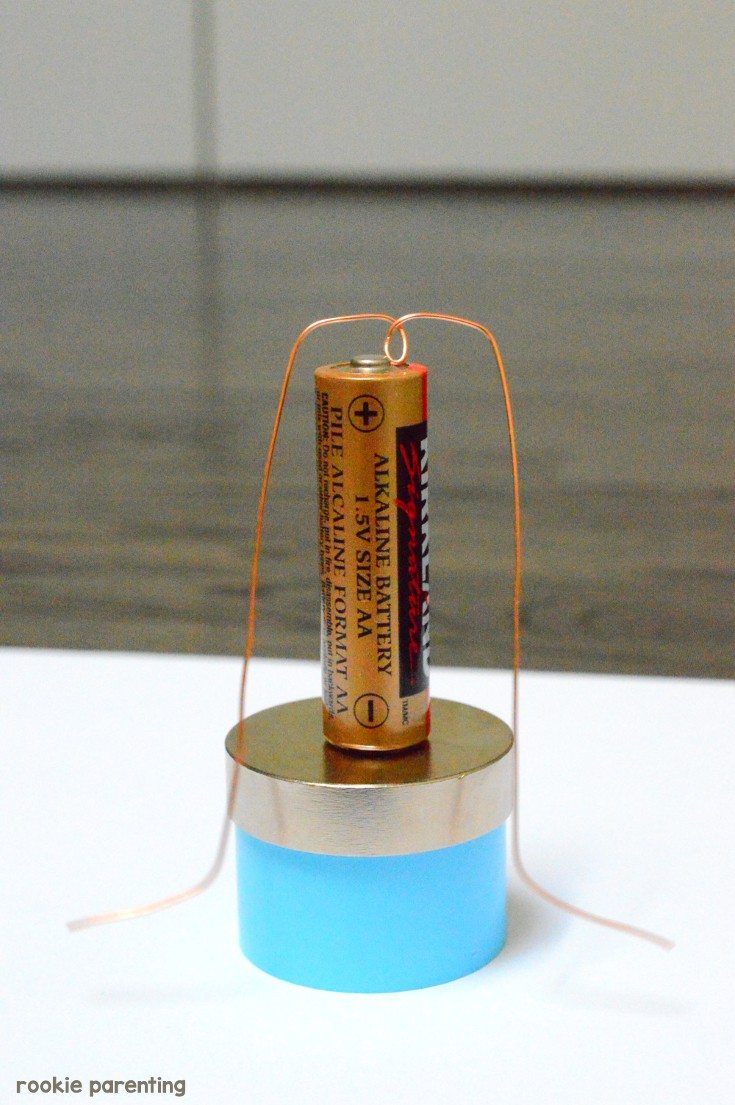
- Carefully put the battery in the center of the disc magnet. Since neodymium magnets are very strong, be careful not to pinch your fingers when doing this. If you need to pull the battery away from the magnet, slide it off the disc. Don’t pull the battery directly from above or you may risk breaking the magnet (or making it very hard to do for yourself).
- Slowly place the wire frame onto the battery and watch it spin.
Warning: Let go of the wire once it makes contact with the battery terminal. Holding a stationary wire to the battery terminals will cause a short circuit which can generate a lot of heat and burn your hand.
Notes
Explore
Making a wire frame that can balance and spin without falling can require some trial and error.
But once you get the basics, you can try making frames in other shapes.
One especially artsy version of this experiment is this wire dancer.
Why
You just built a motor. Amazing, isn’t it?
What you’ve built is called a homopolar motor, which uses direct current from the battery to power rotational movement.
It is called a homopolar motor because, unlike conventional DC motors, the polarity of the magnetic field from the magnet does not change.
When electricity moves through a magnetic field, a force, called Lorentz Force, is generated.
In our experiment, the copper wire conducts electricity from one end of the battery through the magnet to the other end.
As the electric current moves through the magnetic field coming from the neodymium magnet, Lorentz Force is generated which causes the wire to spin.
Experiment 3 – Simple Electric Circuit
Here is a simple experiment with electricity.
Build A Simple Electric Circuit Experiment
In this experiment, we will build a simple closed circuit conducting electricity.
Materials
- small LED light (you can buy a single LED bulb or get one from an old Christmas string light decoration)
- 2 small button batteries
- copper wire
- scotch tape
Tools
- wire cutter
- adult supervision
Instructions
- Cut two pieces of copper wire.


- Stack the two button batteries together (facing the same direction so that + on one battery is touching the – on the other).
- Tape the two pieces of wire onto the batteries, one on the top and one on the bottom.

- Connect one wire to one leg of the LED light and the other wire to the other leg.

- The LED light goes off. Voila! Now you have a simple electric circuit.
- Try to connect and disconnect the wire from the LED light and see what happens.
Notes
A simple electric circuit is an electricity supply (e.g. batteries) connected to a series of electrical wires and electrical equipment (e.g. LED light) to form a circle.
When the circle is not complete, it is called an open circuit. The electrical equipment does not work in an open circuit.
When the circle is complete, electric current can travel from one point of the circle around the loop back to the same point. It is called a closed circuit. The equipment works in a closed circuit.
Recommended Products
As an Amazon Associate, I earn from qualifying purchases.


Experiment 4 – Lemon Battery
How do you generate and store electricity? Here is an awesome electricity science project that demonstrates the basics of electricity.
In this cool battery experiment, you will make your own cell batteries.
How To Use Lemon To Power Light
Learn how to use fruits to generate electricity.
Materials
- lemons (You can start with 4. In general, the more you use, the more power can be generated)
- low voltage LED light bulb (you can buy small LED diodes or get one from an old Christmas string light decoration)
- pieces of copper wire
- galvanized zinc nails (the same number as the number of lemons used)
- electrical wires or alligator clips wires
Tools
- wire cutter
- adult supervision
Instructions
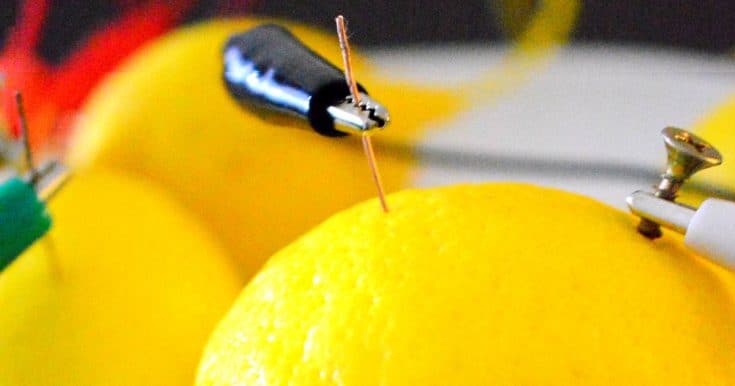
- Roll and squeeze the lemons a little bit by hand to release the juice inside.
- In each lemon, insert 1 zinc nail and 1 small strip of copper wire. Leave a small section in each one out for the electrical wires to connect.
- Using an electrical wire, connect the nail in one lemon to the copper strip in another lemon. Do this to each lemon to form a chain.

- In the first lemon, connect the copper to the long leg of the mini LED bulbs. In the last lemon, connect the nail to the shorter end of the LED light (the shorter leg comes out of the flat side of the LED).
- Voila! You have made a battery.

Notes
Basics of Battery
Batteries are made of two different types of metal suspended in an acidic solution.
In this experiment, copper and zinc (galvanized nails are zinc-plated) are the two metals. The acidic lemon juice serves as the acidic solution.
An electric current is created when the two metals have different tendencies to lose the negatively charged electrons.
Because zinc metal loses electrons more readily than copper, zinc is the negative electrode (anode) and copper is the positive electrode(cathode).
When the battery is connected with a LED bulb, it becomes a closed complete circuit.
The zinc electrode, the LED bulb, and the copper electrode form a complete electronic circuit for the electrical current to go through.
Explore
Let's explore more in this classic science experiment. Can you try the experiment again with the following modifications and see what differences they make?
- Use a different types of citrus fruits to make a fruit battery.
- Use other substances such as a vegetable or a cup of tap water as the conducting solution.
- Use different metals as the electrodes.
- Can you make a coin battery using the same principles?
- Can a potato battery work similarly?
- Is a sour flavor in fruits necessary for the battery to work?
Recommended Products
As an Amazon Associate, I earn from qualifying purchases.

More Experiments On Electricity
-
Awesome Science Experiment for Kids
-
Snap Circuits LIGHT Electronics Exploration Kit
-
Giggleway Electric Motor Robotic Science Kits, DIY STEM Toys for Kids


References
University of Wisconsin-Madison Chemistry Professor Bassam Z. Shakhashiri